Take a look at this trick in the post at http://opendevice.blogspot.com/2008/05/eps-files-and-pdflatex.html. The idea is simple. It asks for converting eps figures into pdf figures before compiling the tex file. But it is necessary to remember that only the name, not the .eps extension, of eps figures can be placed in\includegraphics{}; otherwise the eps figures will be converted every time the tex file is compiled.
"There is this odd quirk in LaTeX. The latex executable compiles your .tex files in the old-fashioned DVI format. As such, it accepts by default only .eps (Encapsulated PostScript) images. pdflatex compiles your .tex files in the standard PDF format. For some mysterious quirk, pdflatex accepts raster formats like .png and .jpg , but does not accept .eps!
Sometimes you want the best of both worlds. An undergraduate of my lab, after some googling, found you can force pdflatex to insert .eps files happily:
1)Install texlive-extra packages, or any other package containing the epstopdf utility.
2) Insert the following code in your .tex file:
\newif\ifpdf
\ifx\pdfoutput\undefined
\pdffalse
\else
\pdfoutput=1
\pdftrue
\fi
\ifpdf
\usepackage{graphicx}
\usepackage{epstopdf}
\DeclareGraphicsRule{.eps}{pdf}{.pdf}{`epstopdf #1}
\pdfcompresslevel=9
\else
\usepackage{graphicx}
\fi
3) Compile using pdflatex with the -shell-escape command line option
It seems to work."
Version Control with VisualSVN Server and TortoiseSVN
Version control is for keeping track all the changes made to the source codes. It is of great convenience for a group of people to work together on the same project as well as a for a student to do his own programming homework. Frankly, I don't know much details of the version control system. It would be crazy for people like me to read its whole manual word by word and to pause frequently to search for all the computer jargon on the internet. So, I managed to learn how to use it quickly for my work.
1. Preparation
You may hear about CVS, an old version control system, but I am using Subversion, which is the new system that becomes more and more popular today.
Subversion manages all the repositories. Repository is the folder where the source codes or project files are stored for version control on the computer. In order to make the repository accessible through internet the Apache HTTP server, which can turn the computer into a web server, need to be installed along with the Subversion system. Since it is not an easy configuration task for them to work happily together I chosen to install VisualSVN Server, which is a package bundle of Subversion, Apache and a management console for Windows platforms.
A client tool is also necessary to communicate with repositories, e.g. download a copy of codes from the repository to local computer ("check out" in jargon) or send modified codes into the repository from local computer ("commit" in jargon). I chosen to use TortoiseSVN, which integrates nicely into the Windows Explorer on the Windows platforms.
2. New Repository Creation
After installing both VisualSVN Server and TortoiseSVN it is then the time to create a repository with an initial copy of your codes. You can read through the tutorial of "Practical guide to subversion on Windows with tortoiseSVN" or follow my simplified steps for doing that.
(1) Open VisualSVN, right click "repositories" in the left frame, choose "create New Repository ..." and uncheck the box of "Create default structure (trunk, branches, tags)".
(2) On your computer, create a folder "tmp", a folder "new" inside "tmp", and three folders named "trunk", "branches", and "tags" inside "new".
(3) Place your codes into the recently created folder "trunk".
(4) Right click the folder "new", choose "TortoiseSVN" and then "Import", choose the right path for your newly created repository, write in the version control message, e.g. "Initial import", and then click "OK".
Note that (1) has to be done on the server computer while (2), (3), and (4) can be done either locally or remotely.
3. Communication with Repository
Please refer to this short TortoiseSVN Tutorial on how to communicate with repositories. It is simple enough to download old codes from and upload modified codes into repositories. All that can be done with TortoiseSVN functions from right clicking your working folders. It should be aware that renaming, deleting, and adding files of codes should all be done with TortoiseSVN, other than through normal file operations in the Windows Explorer, as explained in the TortoiseSVN Tutorial.
So...happy version control!
Extract Plot Data from Scientific Papers
The way for extracting plot data from scientific papers is simple once the right tools have been utilized. On the internet there exist numerous software for serving this purpose but I prefer to use the free ones and those under GNU General Public License. Specifically, the following three are my favorite:
A. Engauge Digitizer - Digitizing software;
B. The Ipe extensible drawing editor;
C. MS Paint - a little drawing tool on Microsoft Windows.
1. Extract the plot as an image file.
This step is quite easy if the paper is already in the pdf format. Open the pdf, enlarge the plot, make a screen capture, paste the capture into MS Paint, cut the plot area, paste the plot into a new file in MS Paint and then save the plot into an image file. But you need to first scan the paper into an image file if it is only a Xerox photocopy. After that, proceed with the scanned image in the same procedure as those for the pdf file.
2. What if the plot is rotated and has undefined coordinates origin?
This could be a rare case but it did happen to me. Here is an example...
 So I used the Ipe drawing editor to define a better coordinate system for the above plot...
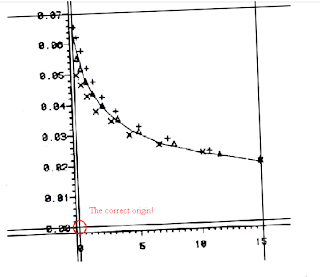 Please refer to the Ipe manual on how to do this.
3. Data extraction
This step is simple enough. Import the plot image into the Engauge Digitizer, define the coordinates with three points (red crosses), set data points (blue crosses) on the curve in the plot, and then extract the data values into a .csv file.
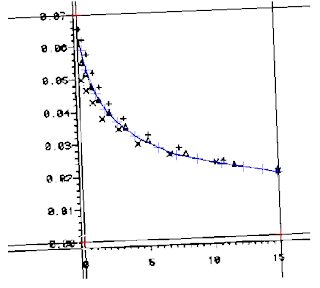
Job done!
情难枕
作词:李子恒 作曲:李子恒 演唱:高胜美
如果一切靠缘份 何必痴心爱着一个人
最怕藕断丝连难舍难分 多少黎明又黄昏
就算是不再流伤心泪 还有魂萦梦牵的深夜
那些欲走还留一往情深 都已无从悔恨
早知道 爱会这样伤人 情会如此难枕 当初何必太认真
早明白 梦里不能长久 相思不如回头 如今何必怨离分
除非是当作游戏一场 红尘任他凄凉 谁能断了这情份
除非把真心放在一旁 今生随缘聚散 无怨无悔有几人
如果一切靠缘份 何必痴心爱着一个人
最怕藕断丝连难舍难分 多少黎明又黄昏
就算是不再流伤心泪 还有魂萦梦牵的深夜
那些欲走还留一往情深 都已无从悔恨
早知道 爱会这样伤人 情会如此难枕 当初何必太认真
早明白 梦里不能长久 相思不如回头 如今何必怨离分
除非是当作游戏一场 红尘任他凄凉 谁能断了这情份
除非把真心放在一旁 今生随缘聚散 无怨无悔有几人
Graphics Drawing Tools for LaTeX
bbs.ctex.org
instanton
金牌会员
UID 4630
精华 1
积分 2680
帖子 1924
威望 756
阅读权限 70
注册 2003-8-27
状态 离线
#20 大中小
发表于 2008-5-5 18:52 资料 个人空间 短消息 加为好友
每隔一段时间这样的问题就卷土重来一次,建议版主开一个置顶贴专门解决这个问题。
我个人的推荐意见:
1. 数据图:任选一款CAS系统(付费),或者用gnuplot之类的工具(免费);
2. 流程图:metapost/Asymptote/pgf-tikz;
3. 几何图形:Geogebra/Z.u.L;
4. 费曼图:Jaxodraw;
5. 徒手画示意图:Mayura Draw(付费),或者TpX/Ipe (免费)。
以上推荐的工具除Mayura Draw、TpX外均是跨平台的,无论使用什么系统均有相应的版本。这里特别介绍一下Ipe这个软件。在本坛上曾经有6个帖子提到这款软件,但都没有提到足够高度。实际上单就徒手画而言,Ipe和TpX是大可以拼一下的。特别是最近的6.0pre30版本,我觉得在易用性上可能比TpX还胜一筹,例如在图形中嵌入数学公式就比TpX来得方便许多。
Texmaker and WinEdt with Foxit PDF Reader
This shows how to customize the Foxit PDF Reader as the PDF viewer for Texmaker and WinEdt.
=============================
Texmaker with Foxit PDF Reader
=============================
1. Make a MSDOS batch file called "viewpdf.bat" in its installation folder with the following lines:
taskkill -fi "windowtitle eq %1*"
start %1
REM "C:\Program Files\Foxit Software\Foxit Reader\Foxit Reader.exe" %1
2. If Foxit PDF Reader is not your default PDF viewer, comment out the second the line, uncomment the third line and make sure the path to the Foxit PDF reader is correct in the "viewpdf.bat".
3. Then open Texmaker and go to "options -> Configure Texmaker" and change the "PDF viewer" to "viewpdf.bat" using the program browsing button.
=============================
WinEdt with Foxit PDF Reader
=============================
Reference: alternative PDF viewer in WinEdt 5.3
1. Add to "Startup.edt" located at PATH_TO_WinEDT\Local\ the following two lines
Assign('AcroRead','"C:\Program Files\Foxit Software\Foxit Reader\Foxit Reader.exe"');
Assign("Acro-Title","Foxit Reader");
and make sure the path to Foxit PDF Reader is correct.
2. Open WinEdt and go to "Macros -> Run startup macro" to refresh the PDF viwer.
3. Add to "Acrobat OpenDoc.bat" located at the PATH_TO_WinEDT\Exec\ the following two lines under "PushTagsandRegisters;":
// Foxit?
FindInString(`%$('AcroRead');`,'Foxit',1,2,1000,1);
IfOK(!"Relax;",!"JMP('not_foxit')");
Run('taskkill -fi "windowtitle eq %N.pdf*"','%P',0,1);
Run('%$("AcroRead"); "%P\%N.pdf"');
RestoreRegisters(1111111111);
Exit;
:not_foxit::
4. Add to "Acrobat CloseDoc.bat" located at the PATH_TO_WinEDT\Exec\ the following two lines under "Requires(20040114);":
// Foxit?
FindInString(`%$('AcroRead');`,'Foxit',1,2,1000,1);
IfOK(!"Relax;",!"JMP('not_Foxit')");
LetRegNum(1,0);
:next_Foxit::
LetRegNum(1,%!1+1);>
IfNum(%!1,99,'>',!"JMP('closed_Foxit')");>
SendMessage("%N - Foxit",$0111,$E152);
IfOK(!"JMP('closed_Foxit')",!"Relax;");
SendMessage("- Foxit",$0111,$E151);
JMP('next_Foxit');
:closed_Foxit::
RestoreRegisters(1111111111);
Exit;
:not_Foxit::
=============================
Automate TeXing with WinEdt
=============================
1. Write a macro called "PDFLatexMacro.edt" as below
Do("Exe('%b\Exec\MikTeX\PDFLaTeX.edt');");
IfOK(!"Relax;",!"JMP('not_SUCCESS')");
Do("Exe('%b\Exec\MikTeX\BibTeX.edt');");
IfOK(!"Relax;",!"JMP('not_SUCCESS')");
Do("Exe('%b\Exec\MikTeX\PDFLaTeX.edt');");
IfOK(!"Relax;",!"JMP('not_SUCCESS')");
Do("Exe('%b\Exec\MikTeX\PDFLaTeX.edt');");
IfOK(!"Relax;",!"JMP('not_SUCCESS')");
Do("Exe('%b\Exec\Acrobat OpenDoc.edt');");
:not_SUCCESS:: // jump to end
End;
and a macro called "DVILatexMacro.edt" as below
Do("Exe('%b\Exec\MikTeX\LaTeX.edt');");
IfOK(!"Relax;",!"JMP('not_SUCCESS')");
Do("Exe('%b\Exec\MikTeX\BibTeX.edt');");
IfOK(!"Relax;",!"JMP('not_SUCCESS')");
Do("Exe('%b\Exec\MikTeX\LaTeX.edt');");
IfOK(!"Relax;",!"JMP('not_SUCCESS')");
Do("Exe('%b\Exec\MikTeX\LaTeX.edt');");
IfOK(!"Relax;",!"JMP('not_SUCCESS')");
Do("Run(|%$('DVIView'); -1 ""%P\%N.dvi""|);");
:not_SUCCESS:: // jump to end
End;
and place them under PATH_TO_WinEDT\Macros\Recorder\.
2. Open WinEdt, go to "Options -> Menu Setup", double-click "&Tools", and then right-click the menu items to insert the two macros above.
=============================
Texmaker with Foxit PDF Reader
=============================
1. Make a MSDOS batch file called "viewpdf.bat" in its installation folder with the following lines:
taskkill -fi "windowtitle eq %1*"
start %1
REM "C:\Program Files\Foxit Software\Foxit Reader\Foxit Reader.exe" %1
2. If Foxit PDF Reader is not your default PDF viewer, comment out the second the line, uncomment the third line and make sure the path to the Foxit PDF reader is correct in the "viewpdf.bat".
3. Then open Texmaker and go to "options -> Configure Texmaker" and change the "PDF viewer" to "viewpdf.bat" using the program browsing button.
=============================
WinEdt with Foxit PDF Reader
=============================
Reference: alternative PDF viewer in WinEdt 5.3
1. Add to "Startup.edt" located at PATH_TO_WinEDT\Local\ the following two lines
Assign('AcroRead','"C:\Program Files\Foxit Software\Foxit Reader\Foxit Reader.exe"');
Assign("Acro-Title","Foxit Reader");
and make sure the path to Foxit PDF Reader is correct.
2. Open WinEdt and go to "Macros -> Run startup macro" to refresh the PDF viwer.
3. Add to "Acrobat OpenDoc.bat" located at the PATH_TO_WinEDT\Exec\ the following two lines under "PushTagsandRegisters;":
// Foxit?
FindInString(`%$('AcroRead');`,'Foxit',1,2,1000,1);
IfOK(!"Relax;",!"JMP('not_foxit')");
Run('taskkill -fi "windowtitle eq %N.pdf*"','%P',0,1);
Run('%$("AcroRead"); "%P\%N.pdf"');
RestoreRegisters(1111111111);
Exit;
:not_foxit::
4. Add to "Acrobat CloseDoc.bat" located at the PATH_TO_WinEDT\Exec\ the following two lines under "Requires(20040114);":
// Foxit?
FindInString(`%$('AcroRead');`,'Foxit',1,2,1000,1);
IfOK(!"Relax;",!"JMP('not_Foxit')");
LetRegNum(1,0);
:next_Foxit::
LetRegNum(1,%!1+1);>
IfNum(%!1,99,'>',!"JMP('closed_Foxit')");>
SendMessage("%N - Foxit",$0111,$E152);
IfOK(!"JMP('closed_Foxit')",!"Relax;");
SendMessage("- Foxit",$0111,$E151);
JMP('next_Foxit');
:closed_Foxit::
RestoreRegisters(1111111111);
Exit;
:not_Foxit::
=============================
Automate TeXing with WinEdt
=============================
1. Write a macro called "PDFLatexMacro.edt" as below
Do("Exe('%b\Exec\MikTeX\PDFLaTeX.edt');");
IfOK(!"Relax;",!"JMP('not_SUCCESS')");
Do("Exe('%b\Exec\MikTeX\BibTeX.edt');");
IfOK(!"Relax;",!"JMP('not_SUCCESS')");
Do("Exe('%b\Exec\MikTeX\PDFLaTeX.edt');");
IfOK(!"Relax;",!"JMP('not_SUCCESS')");
Do("Exe('%b\Exec\MikTeX\PDFLaTeX.edt');");
IfOK(!"Relax;",!"JMP('not_SUCCESS')");
Do("Exe('%b\Exec\Acrobat OpenDoc.edt');");
:not_SUCCESS:: // jump to end
End;
and a macro called "DVILatexMacro.edt" as below
Do("Exe('%b\Exec\MikTeX\LaTeX.edt');");
IfOK(!"Relax;",!"JMP('not_SUCCESS')");
Do("Exe('%b\Exec\MikTeX\BibTeX.edt');");
IfOK(!"Relax;",!"JMP('not_SUCCESS')");
Do("Exe('%b\Exec\MikTeX\LaTeX.edt');");
IfOK(!"Relax;",!"JMP('not_SUCCESS')");
Do("Exe('%b\Exec\MikTeX\LaTeX.edt');");
IfOK(!"Relax;",!"JMP('not_SUCCESS')");
Do("Run(|%$('DVIView'); -1 ""%P\%N.dvi""|);");
:not_SUCCESS:: // jump to end
End;
and place them under PATH_TO_WinEDT\Macros\Recorder\.
2. Open WinEdt, go to "Options -> Menu Setup", double-click "&Tools", and then right-click the menu items to insert the two macros above.
My Dual-Boot Notebook
===========================
Thinkpad X61
===========================
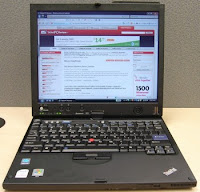
I got my second notebook, Thinkpad X61, a few days ago. With a 12.1 inch screen and no CDROM attached it weighs only 2.2 lbs, which is great for traveling. I chose it because I was really not happy with the weight of my old HP notebook: 7.25 lbs without battery. Before I made the oder I also looked into most popular 9 inch netbooks, such as Asus EEE PC, Acer Aspire One, and Dell E netbook. But they all have some unsolved performance issues with their ATOM cpus and onboard hard drives. I didn't go for Mac Air as well because a notebook that expensive means the same as robbery to me and it also restricts the fun you can find from trying all kinds of software.
As my Thinkpad X61 arrived I found everything to be great except the notorious Windows Vista operating system. My dislike of Vista is not lone but shared by all my friends, by news reports, and even by Bill Gates. So my immediate decision was to reinstall the operating system from scratch for the new notebook. This blog then records all the steps I took for that purpose, most of which were dug out deep from the internet using Google.
I have to mention that Thinkpad X61 has an over-heating issue with its wifi card under the right palm. The issue is most severe with Linux because the system just can't manage the wifi card that well. It is even worse on my notebook since the madwifi wireless driver doesn't have support for power management for the Atheros chip. But the issue is not obvious under Windows XP and becomes zilch after turning off the wifi card in the BIOS.
MACHINE: Thinkpad X61 7675CTO
(Intel Core2 Duo CPU T8100 @ 2.1GHz x 2, 2G RAM, 100G 7200RPM Hard Drive)
===========================
Dual-Boot Systems
===========================
The reinstallation was then planned for a dual-boot system with Windows XP Professional and 64-bit Ubuntu Hardy Heron. The Windows system was setup first and the Ubuntu second. The original hard drive partition and the unseen Windows vista recovery partition were all deleted at installing the Windows system. About 85 GB hard drive space was allocated to the Windows system and was divided into three NTFS primary partitions of 25 GB, 30GB, and 30GB, respectively. The remaining 15 GB was late formatted as a 12 GB ext3 root system and a 2 GB swap space for the Linux system. This allocation seemed too stingy for the Linux system, but I didn't realize this after completed all the work and tried out the new systems for a couple of days. Now I have learned that at least 30 GB hard drive space is necessary for carrying out some basic computational work on the Linux system. What a pity!
(TO BE CONTINUED...)
WINDOWS SYSTEM: Microsoft Windows XP Professional SP3

LINUX SYSTEM: Ubuntu 8.04.1 Hardy Heron
(Kernel 2.6.24-19-generic, Gnome 2.22.3, I386x64)

===========================
Windows XP Setup
===========================
===========================
Ubuntu Hardy Setup
===========================
# powertop:
1. echo 1500 > /proc/sys/vm/dirty_writeback_centisecs
2. sysfutils->ships sysfs.conf which allows to conveniently set sysfs attributes change
cpu frequency scaling to ondemand
# wlan power management:
no power management on madwifi driver for atheros
# chinese
1. language support -> chinese
2. scim setup
# Wpa2
1. /etc/ssl/certs/ca-certificates.crt
2. not done
# LaTex
1. texlive
2. texmaker
# Terminal
1. devils pie
2. setup
# intel compilers
0. fix errors when you try an initial install
1. cce
2. fce
3. mkl
# wireless
remove network-manager
install wicd
remove wicd
intall network-manager
wireless not working
install latest madwifi by replacing its ath_hal with latest hal from people.freebsd.org/~sam
restart and stop wireless roaming
start wireless roaming and works.
# syslog-ng
replace klogd and sysklogd
send network-manager messages to /dev/null with permission change.
# hug log files
solved by deleting network profiles for wpa2
Thinkpad X61
===========================
I got my second notebook, Thinkpad X61, a few days ago. With a 12.1 inch screen and no CDROM attached it weighs only 2.2 lbs, which is great for traveling. I chose it because I was really not happy with the weight of my old HP notebook: 7.25 lbs without battery. Before I made the oder I also looked into most popular 9 inch netbooks, such as Asus EEE PC, Acer Aspire One, and Dell E netbook. But they all have some unsolved performance issues with their ATOM cpus and onboard hard drives. I didn't go for Mac Air as well because a notebook that expensive means the same as robbery to me and it also restricts the fun you can find from trying all kinds of software.
As my Thinkpad X61 arrived I found everything to be great except the notorious Windows Vista operating system. My dislike of Vista is not lone but shared by all my friends, by news reports, and even by Bill Gates. So my immediate decision was to reinstall the operating system from scratch for the new notebook. This blog then records all the steps I took for that purpose, most of which were dug out deep from the internet using Google.
I have to mention that Thinkpad X61 has an over-heating issue with its wifi card under the right palm. The issue is most severe with Linux because the system just can't manage the wifi card that well. It is even worse on my notebook since the madwifi wireless driver doesn't have support for power management for the Atheros chip. But the issue is not obvious under Windows XP and becomes zilch after turning off the wifi card in the BIOS.
MACHINE: Thinkpad X61 7675CTO
(Intel Core2 Duo CPU T8100 @ 2.1GHz x 2, 2G RAM, 100G 7200RPM Hard Drive)

===========================
Dual-Boot Systems
===========================
The reinstallation was then planned for a dual-boot system with Windows XP Professional and 64-bit Ubuntu Hardy Heron. The Windows system was setup first and the Ubuntu second. The original hard drive partition and the unseen Windows vista recovery partition were all deleted at installing the Windows system. About 85 GB hard drive space was allocated to the Windows system and was divided into three NTFS primary partitions of 25 GB, 30GB, and 30GB, respectively. The remaining 15 GB was late formatted as a 12 GB ext3 root system and a 2 GB swap space for the Linux system. This allocation seemed too stingy for the Linux system, but I didn't realize this after completed all the work and tried out the new systems for a couple of days. Now I have learned that at least 30 GB hard drive space is necessary for carrying out some basic computational work on the Linux system. What a pity!
(TO BE CONTINUED...)
WINDOWS SYSTEM: Microsoft Windows XP Professional SP3

LINUX SYSTEM: Ubuntu 8.04.1 Hardy Heron
(Kernel 2.6.24-19-generic, Gnome 2.22.3, I386x64)

===========================
Windows XP Setup
===========================
===========================
Ubuntu Hardy Setup
===========================
# powertop:
1. echo 1500 > /proc/sys/vm/dirty_writeback_centisecs
2. sysfutils->ships sysfs.conf which allows to conveniently set sysfs attributes change
cpu frequency scaling to ondemand
# wlan power management:
no power management on madwifi driver for atheros
# chinese
1. language support -> chinese
2. scim setup
# Wpa2
1. /etc/ssl/certs/ca-certificates.crt
2. not done
# LaTex
1. texlive
2. texmaker
# Terminal
1. devils pie
2. setup
# intel compilers
0. fix errors when you try an initial install
1. cce
2. fce
3. mkl
# wireless
remove network-manager
install wicd
remove wicd
intall network-manager
wireless not working
install latest madwifi by replacing its ath_hal with latest hal from people.freebsd.org/~sam
restart and stop wireless roaming
start wireless roaming and works.
# syslog-ng
replace klogd and sysklogd
send network-manager messages to /dev/null with permission change.
# hug log files
solved by deleting network profiles for wpa2
Bolzano-Weierstrass Property
I used here the proof of the Bolzano-Weierstrass Property from the book "Elementary Real Analysis" by Thomson et al.. Note this theorem is different than the Bolzano-Weierstrass Theorem.
\begin{theorem} A set of real numbers $E$ is closed and bounded if and only if every sequence of points chosen from the set has a subsequence that converges to a point that belongs to $E$. \end{theorem}
\begin{corollary} A set of real numbers $E$ is closed and bounded if and only if every sequence of $E$ has a point of accumulation that belongs to $E$. \end{corollary}
\begin{proof} Suppose that $\E$ is both closed and bounded and let $\{x_n\}$ be a sequence of points chosen from $E$. Since $E$ is bounded this sequence $\{x_n\}$ must be bounded too. We apply the Bolzano-Weierstrass theorem for sequences to obtain a subsequence $\{x_{n_k}\}$ that is both monotonic and convergent. If $x_{n_k}\rightarrow z$ then there is $K$ such that $|x_{n_k}-z|<\epsilon$ for all $k\geq K$ and any positive $\epsilon$ . Since all the points of this subsequence belong to $E$ the neighborhoods of $z$ contain infinite points belong to $E$. So, by definition $z$ is a point of accumulation of $E$. Now we see that $ z\in E$ since $\E$ is closed.
So the Bolzano-Weierstrass Property is really that every sequence of a set of real numbers has a subsequence that converges to a point, or has a point of accumulation, that belongs to this set.
In the opposite direction we suppose that there is a set E which has the Bolzano-Weierstrass property but we don't know in advance if $E$ is closed and bounded. Then E cannot be unbounded. For example, if $E$ is unbounded then there is a sequence of points $\{x_n\}$ of $E$ with $x_n\rightarrow \infty$ or $x_n\rightarrow -\infty$ and no subsequence of that sequence converges, which contradicts the assumption. Also, $E$ must be closed. If $E$ is not closed, there is a point of accumulation $z$ such that $z\ni E$. This means that there is a sequence of points $\{x_n\}$ in $E$ converging to $z$. But any subsequence of $\{x_n\}$ would also converge to $z$ and $z\ni E$, which contradicts the Bolzano-Weierstrass Property assumed for $E$. \end{proof}
References: Bolzano-Weierstrass theorem
~~~
Riemann or Lebesgue integration
Excerpt from Martin Davis and Matt Insall, "Mathematics and Design: Yes, But Will it Fly?", Nexus Network Journal, vol. 4, no. 4 (Autumn 2002).
At 06:39 AM 8/26/2002, Matt Insall wrote:
At 06:39 AM 8/26/2002, Matt Insall wrote:
Personally, I think it is likely to make a difference whether Riemann or Lebesgue integration is used, but that the difference will only be noticeable provided that the designers rigorously adhere to the requirements that that particular integration theory be used for all the integrals. As soon as they revert to numerical approximations, instead of using calculus or analysis, they have muddied the waters so that no direct comparison between one integration theory and another can be made.
This is with reference to Hamming's quip about this difference not being significant for engineering design.
Functions that are Riemann integrable are automatically Lebesgue integrable and the values of the integrals will be the same. There are two ways in which a function can be Lebesgue integrable but not Riemann integrable. Any bounded measurable function is L-integrable, but not all of them are R-integrable. Some unbounded measurable functions are also L-integrable, but not Riemann integrable, since all R-integrable functions are bounded. An example: the function 1/sqrt(x) has the L-integral 2/3 on the interval [0,1]. Being unbounded in that interval, it has no R-integral there.
Of course, this function does have an "improper integral" (sometimes called a Riemann-Cauchy integral) in that interval with the very same value. Only functions having absolutely convergent improper integrals have Lebesgue integrals. The classical example is sinx/x on the interval [0,\infnty] which has the value \pi/2 but no Lebesgue integral. This fact is sometimes confusingly stated as a case where something is R-integrable but not L-integrable. But one can perfectly well define "improper"
L-integrals, so that this comparison is inappropriate. It's just that the definition of L-integration automatically includes cases that in the Riemann case require this extra limiting step for which the inappropriate term "improper" is used.
Hamming of course hadn't meant to be taken so literally. His aphorism was intended to say that the fine points of mathematical analysis are not relevant to engineering considerations. And, he was perfectly right.
In the long-ago days when I had occasion to be on committees administering an oral qualifying exam for the doctorate, I would often ask the hapless student why analysts prefer the L-integral. This was a trap question: students who fell for the trap would tell me that the function on [0,1] that is 1 on the irrationals and 0 on the rationals is L-integrable, but not R-integrable. The right answer is that the L-integral has useful convergence properties not enjoyed by the R-integral.
Now whatever did Mat Insall have in mind? sin x/x on [0,infty]? Surely not in any engineering analysis.
Terminal, Console, and Shell
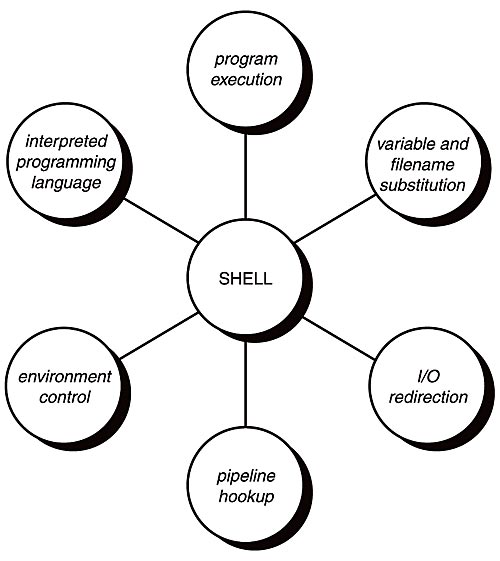
After searching the internet for quite some time I finally had some sense of the relationship among terminal, console and shell.
1. Terminal
Real text terminal: Includes only a screen (NOT TO BE CALLED "MONITOR" AS FOR TODAY'S COMPUTER), keyboard, and a small memory to store a screenfull text (ONLY A FEW KILOBYTES). Keyboard is plugged to screen, which is further wired to the serial port of computer with a long cable.
Terminal emulation: An emulated real text terminal created by computer software and classfied as virtual terminal and pseudo terminal.
Virtual terminal or console: The command line interface seen after the boot of Linux system. By default, seven virtual terminals are available and can be switched using [CTRL]+[Fn] (n: 1-7). The 7th virtual terminal is reserved for X-windows system and the rest are for textual Shells.
Pseudo terminal: A pseudo-device pair that provides a text terminal interface without associated virtual console, computer terminal or serial port hardware. Its applications include terminal emulator and remote login handler.
Terminal emulator: Xterm, Konsole and alike on X windows systems, which serve as master device (/dev/ptmx) while Shell serves as slave device(/dev/pts/N)
Remote login handler: SSH and Telnet, which serve as master device (/dev/ptmx) while Shell serves as slave device(/dev/pts/N).
2. Console: The monitor and keyboard on today's computers or the real text terminal on old time computers.
3. Shell: A utility program resides on hard disk, by default the first program to start after a user log onto the system, and classfied as login shell, interactive shell and conventional shell.
 Interactive, login shell: The shell reads these files in sequence: (system wide) /etc/profile; (per user) ~/.bash_profile; ~/.bash_login; ~/.profile; (when logout) ~/.bash_logout.
Interactive, non-login shell: The shell reads these files in sequence: (per user) ~/.bashrc; (when exit) ~/.bash_logout.
Non-interactive, login shell: The shell reads these files in sequence: (system wide) /etc/profile; (per user) ~/.profile; (when logout) ~/.bash_logout.
Non-interactive, non-login shell: The shell starts by executing $BASH_ENV and exits with reading ~/.bash_logout.
4. Login Process: For wired connection, init-> getty -> login-> first program to run, usually Shell; for network connections, init -> sshd, telnetd, or rlogind -> login -> first program to run, usually Shell.
References:
1. Text Terminal HOW-TO
2. Pseudo Terminal Master/Slave
3. What is Unix Shell?
4. How Environment Variables Really Work?
1. Terminal
Real text terminal: Includes only a screen (NOT TO BE CALLED "MONITOR" AS FOR TODAY'S COMPUTER), keyboard, and a small memory to store a screenfull text (ONLY A FEW KILOBYTES). Keyboard is plugged to screen, which is further wired to the serial port of computer with a long cable.
Terminal emulation: An emulated real text terminal created by computer software and classfied as virtual terminal and pseudo terminal.
Virtual terminal or console: The command line interface seen after the boot of Linux system. By default, seven virtual terminals are available and can be switched using [CTRL]+[Fn] (n: 1-7). The 7th virtual terminal is reserved for X-windows system and the rest are for textual Shells.
Pseudo terminal: A pseudo-device pair that provides a text terminal interface without associated virtual console, computer terminal or serial port hardware. Its applications include terminal emulator and remote login handler.
Terminal emulator: Xterm, Konsole and alike on X windows systems, which serve as master device (/dev/ptmx) while Shell serves as slave device(/dev/pts/N)
Remote login handler: SSH and Telnet, which serve as master device (/dev/ptmx) while Shell serves as slave device(/dev/pts/N).
2. Console: The monitor and keyboard on today's computers or the real text terminal on old time computers.
3. Shell: A utility program resides on hard disk, by default the first program to start after a user log onto the system, and classfied as login shell, interactive shell and conventional shell.
Interactive, login shell: The shell reads these files in sequence: (system wide) /etc/profile; (per user) ~/.bash_profile; ~/.bash_login; ~/.profile; (when logout) ~/.bash_logout.Interactive, non-login shell: The shell reads these files in sequence: (per user) ~/.bashrc; (when exit) ~/.bash_logout.
Non-interactive, login shell: The shell reads these files in sequence: (system wide) /etc/profile; (per user) ~/.profile; (when logout) ~/.bash_logout.
Non-interactive, non-login shell: The shell starts by executing $BASH_ENV and exits with reading ~/.bash_logout.
4. Login Process: For wired connection, init-> getty -> login-> first program to run, usually Shell; for network connections, init -> sshd, telnetd, or rlogind -> login -> first program to run, usually Shell.
References:
1. Text Terminal HOW-TO
2. Pseudo Terminal Master/Slave
3. What is Unix Shell?
4. How Environment Variables Really Work?
MiKTeX's Secret: Local Package Repository
The error in the installation of LaTeX packages from a local package repository on MiKTeX might be:
".... does not seem to be a local package repository".
The problem can be solved by downloading "readme.txt", "miktex-zzdb1.cab", and "miktex-zzdb2.cab" into the folder that contains the LaTeX packages you wish to install.
".... does not seem to be a local package repository".
The problem can be solved by downloading "readme.txt", "miktex-zzdb1.cab", and "miktex-zzdb2.cab" into the folder that contains the LaTeX packages you wish to install.
When you install printer drivers
When you install printer drivers please don't forget to log on as administrator. Otherwise, you probably would see warning messages such as "Error Tag = AddPrinterDriver(0)", "The Specified Module Can't Be Found", "Operation Not Allowed" and so on and most likely can't find a solution through Google and Yahoo.
Linux Commands (Day 1)
(1) Change file permissions
chmod 644 filename ## assign the file read/write by the owner and only read by everyone else (-rw-r--r--).
chmod -R 644 foldername ## assign all the files in the folder read/write by the owner and only read by everyone else (-rw-r--r--).
r:
400 read by owner
040 read by group
004 read by anybody (other)
w:
200 write by owner
020 write by group
002 write by anybody
x:
100 execute by owner
010 execute by group
001 execute by anybody
(2) Secure copy files between Linux hosts
scp user@remote-computer:/remote-path/remote-file /local-path/local-file ## copy a file from a remote computer to the computer you are working at.
scp -r user@remote-computer:/remote-path/remote-directory /local-path/local-directory ## copy a folder from a remote computer to the computer you are working at.
scp /local-path/local-file user@remote-computer:/remote-path/remote-file ## copy a file from the computer you are working at to a remote computer.
scp -r /local-path/local-directory user@remote-computer:/remote-path/remote-directory ## copy a file from the computer you are working at to a remote computer.
(3) Control jobs
jobs ## list jobs.
%1 ## resume the first stopped job.
fg %1 ## resume the first stopped job.
%1 & ## put the first stopped job into background.
bg %1 ## put the first stopped job into background.
kill %1 ## terminate the first stopped job.
nohup myjob.sh & ## run myjob.sh in the background as a process detached from the console and send output to nohup.out by default.
script...exit ## start a new shell and log all the output into the file called typescript.
(4) Capture outputs
(((./cmd | tee stdout.txt) 3>&1 1>&2 2>&3 | tee stderr.txt) 3>&1 1>&2 2>&3) 1>out.txt 2>err.txt ## see explanation at http://www.cpqlinux.com/redirect.html.
(5) Emacs tutorial
移动硬盘的科普
如果在选购移动硬盘时被店员问及需要的是串口还是并口?请跟他好好说,谢谢,我只是看看,然后掉头就走,不要浪费时间!以下是为什么:
移动硬盘就是外置硬盘,不是接在电脑机箱内部的那种。请记住:移动硬盘 = 硬盘 + 硬盘盒,硬盘通过电源线和数据线连接在硬盘盒内,装有硬盘的硬盘盒再通过电源线和数据线连接在电脑上。所以,选购移动硬盘要考虑硬盘盒内有是否有对应硬盘接口的数据线,以及硬盘盒外和电脑上是否是否有相对应的接口。
(0)数据线及其接口的不同反映了数据传输速度的不同。
(1)硬盘盒内的数据线对应于硬盘的数据接口,硬盘的数据接口有分IDE,SCSI,和SATA,相应的硬盘也叫做IDE,SCSI,和SATA硬盘。
IDE又叫做Parallel ATA,SATA则是Serial ATA的简写,中文翻译过来前者叫并行ATA,后者叫串行ATA,这和什么“串口”和“并口”完全是两码事!“串口”和“并口”英文翻译过来叫Serial Port和Parallel Port,他们的数据传输速度非常的低,是绝对不会用在硬盘上的!
如果选购Serial ATA硬盘,请注意它的价格要贵一点!如果选购IDE硬盘,记得区分下面几种规格。由上而下,它们代表了传输速率的增加!
ATA-1
ATA-2
ATA-3
ATA-4
Ultra ATA/33
Ultra ATA/66
Ultra ATA/100
Ultra ATA/133
此外还得区分硬盘转速的不同,转速高当然就好些:
5400rpm
7200rpm
以及硬盘的尺寸,3.5“是台式机使用的那种硬盘,2.5"是笔记本电脑使用的那种硬盘:
5.25 inches
3.5 inches
2.5 inches
(2) 硬盘盒外的数据接口可以是USB、IEEE1394、eSATA,最常用的是USB 2.0,其他的应用都比较受限制。
(3)硬盘盒的尺寸是根据所装东西的大小来定义的,5.25”是用来装光驱的,2.5“是用来装笔记本那种硬盘的,3.5“是用来装台式机的那种硬盘。硬盘盒有分铝或者金属外壳和塑料外壳,前者散热比较好,如果还有个小风扇就更好了。当然,要试试看外置盒运转起来是否噪音比较小!
现在应该明白为什么那个店员值得鄙视了吧,别总以为老百姓可以糊弄,考古挖坑是个人都会!这次你可找到他直接明白的说:
我想买一个移动硬盘,要7200转的IDE Ultra ATA/133或者Serial ATA硬盘,外置盒是USB 2.0接口,3.5 inches大,散热好,噪音小,请问有什么选择没有?
他要是听不明白,请跟他说,你去旁边帮我问问,别串口并口的,呵呵!
下面是考古的帖子:
硬盘传输接口
硬盘盒
The official external ENCLOSURE thread
The Break Up Song
Here you can see the wonderful Ukulele!
Lyrics
dont think about the times we have to try to make things last,
dont think about the times when we first kissed you say we wouldnt race to fast,
dont think about the times we have to try to make things right,
cause you and i both know we always get into little fights,
cause love is not the best thing for us now,
its not the best thing for us now,
so im a break it off with you somehow,
the stars would shine for you another day, another day,
so im a try nd love you some other day,
im know im not in need for love,
for love, for love, for love,
my heartache should have been enough for you,
just get on with your life, your life, she say,
wanna be my wife, i say,
gotta make you right before
i get back on my feet, my feet,
get back on my feet,
cause love is not the best thing for us now,
its not the best thing for us now,
so im a break it off with you some how,
the stars would shine for you another day, another day,
so im a try and love you some other way,
dont think about us breakin up
think about you and me makin love
n' think about the lord above
n' thank him for the gift of love
you and i we gotta split apart
n' take a wrong journey through the dark
n' nows the time you got to be strong
just make sure your love carries on
Kewei Tay
This is where I get to know the name of 方大同! I'd love to have this girl as my wedding singer! You can listen to some other songs of her at taykewei.blogspot.com.
学习 Screen (Day 1)
这些同标题的一系列帖子是用来记录我对Screen(一个有趣并且非常有用的Linux软件)的理解和使用。
Screen是用来在linux机器上同时进行多任务操作的program,这看来和在Windows上一边放mp3一边看网页一边跑程序没什么区别,但是Screen的重要性在于她可以使跑在Linux服务器上的程序持续保持运行,不受用户退出或者关闭与Linux服务器链接的影响。
这对成天跑程序做计算的我们实在是太有帮助了!举个实际操作的小例子:我先用SSH远程登录到Linux服务器,在bash下运行Screen,然后在Screen上运行我的计算程序,接着脱离这个Screen(注意,是脱离,不是退出),再退出Linux帐户并关闭SSH;几天以后,当我再次SSH远程登录到Linux服务器,运行Screen,可以发现原来的计算程序一直还在运行;但是如果我在上次离开的时候选择关闭Screen,那么我的计算程序也会即时被终止。
Screen可以生成很多session,每个session又可以生成很多window,每个window都可以看成是一个独立的shell,每个shell都可以做独立的事情。下面是她一些常用的Linux命令,$代表当前shell的提示符,##代表对命令的解释,Ctrl代表Ctrl键。
$ Screen -S mywork ## 创建Screen下以mywork为名的一个session和这个session下的第1个window。
Ctrl-a A ## 为当前window添加名字。
Ctrl-a c ## 在当前session下创建新的window。
Ctrl-a A ## 为当前window改变名字。
Ctrl-a “ ## 浏览当前session下的所有window并转换window。
Ctrl-a d ## 脱离当前window当前session,回到用户的bash下。
$ Screen -ls ## 浏览Screen下所有的session以及他们的状态。
$ Screen -r mywork ## 再次链接到Screen下以mywork为名字的那个session的上次脱离的window。
$ exit ## 退出当前window并转移到这个session下的上一个window(当退出这个session下最后一个window时,这个session也就自动退出)。
一些references:
[how-to] GNU Screen
GNU Screen -- MITBBS Linux版镇版之宝
Complete Screen Manual
Subscribe to:
Comments (Atom)

